[Back To FloydWeb Page] [Back To My Music Page] [Back To Welcome Page] [Back to Goldwing Page]
Custom GPS Bracket Installation
This is a documentary of the installation of a custom bracket for a Garmin 276C GPS unit on my 2004 Honda Goldwing.
First off, I must give credit and a special thank you to two people who made this possible for me.
Jon Sargeant, who provided me with this prototype bracket and some of the hardware.
Jon does amazing things with wings. Thanks John!
Check him out at http://www.goldwinggadgets.com/
And Fred Harmon, who through his videos gave me the know how and confidence to perform this procedure.
Thanks Fred! (Fred, send me a link if you want and I'll post it here)
I have never met either of these gentlemen personally, but I hope to meet both of them in my travels someday.
OK, here we go!
This is the bracket that Jon sent me.
After much consideration and research, I decided I wanted the GPS mounted center in front of me,
and not on the handlebars. I also wanted it within reach to comfortably get to the control buttons.

Here's a few more pics with the hardware.
The bracket is made of 16 gauge powder coated steel, and all mounting hardware is stainless steel,
except for the back plate which is made of brass and sprayed with Rustolium.


I added a rubber gasket under the bracket for increased vibration isolation and to keep moisture out.
I cut a bicycle inner tube to make it. You'll see where I placed it later.

The bracket will be installed just above the radio where the Goldwing emblem is.

Once I had gathered all the hardware, it was time to see what was under the shelter where that emblem is.
In order to do that, I had to remove the seat, the instrument panel cover, and the top shelter.
For the best instructions on how to do this, see Fred's DVD's.

Here's the top shelter removed, and a closer look at the installation site.
Not as scary as it seems.

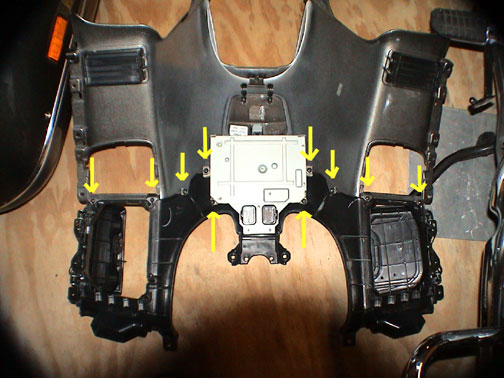
Flip over the shelter to see the audio unit.
I separated the painted part from the rubbery black part by removing the 10 screws indicated by the arrows.
This allowed me to get under the radio without actually having to remove it, and it was easier to work with.


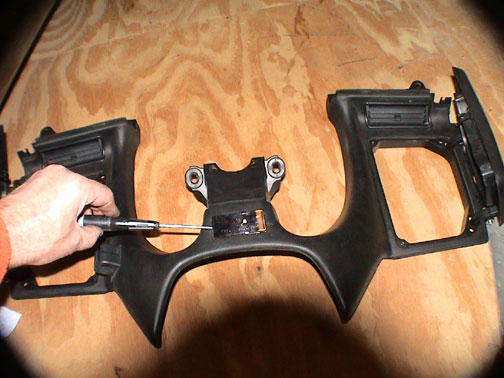
I then just pried off the emblem with a little screw driver.
There was some glue under there that I removed with some mineral spirits and a screw driver.


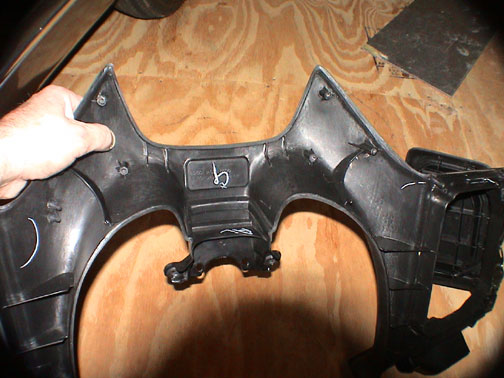
So here's the spot I will secure the bracket to with the back plate.
It didn't look like there was going to be enough room between the radio and the shelter for the back plate, but there was.

Now I could go in the nice warm house from the cold garage... which is actually just a large shed,
and install the bracket. I drilled two holes, and here's where I put the rubber gasket, between the bracket and the bike.


Here's the bracket installed.

On the underside, I didn't like the bolts extending from the nuts, so I cut them off and filed them down smooth.
I then put another piece of rubber over that (not pictured) to keep it from rubbing on the radio.


Back out into the cold, and put the shelter together and in place.
You can now see the GPS mounting ring attached to the bracket.
I used the marine mounting bracket that came with the GPS.


I ran into trying to put a square peg in a round hole in trying to get the instrument panel cover back on.
If I tried sliding it under the bracket first, it would get hung up on the dash.

If I tried sliding it under the dash first, it would get hung up on the bracket.

I had to remove the circular mounting ring from the bracket and do alot of bending and twisting and manipulating.
That was probably the scariest part because the plastic is more brittle in the cold.
I got it on with no casualties.

Here's the Kennedy GPS/MPG interface wired up and tucked in under the left pocket.
I ran the wire to the GPS up underneath the plastic. You can see it coming out on the right side of the ignition.
I wound up bringing it up on the left side. That worked out better.

Here it is, mounted and all wired up.

Here's a few more shots from different angles. I really like this installation.
It's clean, excellent visibility of the GPS, dash display, instrument panel, and the road.
The unit is easily reached while riding as well.
Time for a road trip! Thanks for viewing.


Here's a night shot for you. Excellent visibility!

[Back To FloydWeb Page] [Back To My Music Page] [Back To Welcome Page] [Back to Goldwing Page]
Brought to you by: